Last week I participated in Procjam 2014. Procjam is a game jam about procedural generation in which you are encouraged to build a game or tool that utilises some form of procedural generation.
This jam coincided with a few things I’ve been wanting to try. Namely:-
1) I’ve been meaning to try Phaser out for some time. It seems like an ideal framework for rapidly prototyping games and making them publicly available.
2) I’ve also been itching to create a roguelike for quite some time (as has every man/woman and his/her dog/cat).
Procedural generation really appeals to me, not only because it has the potential to save considerable time in producing content, but also because it’s really fun to write a piece of code that creates imaginative content without the intervention of a human.
I started by investigating roguelikes and phaser and quickly discovered a guide to creating a roguelike in phaser. Pretty handy as a starting point. I quickly deviated from the guide but it did give me a good hint at the sort of direction I should follow.
You can play my entry, Dronelike, here and the full source code is also available here.
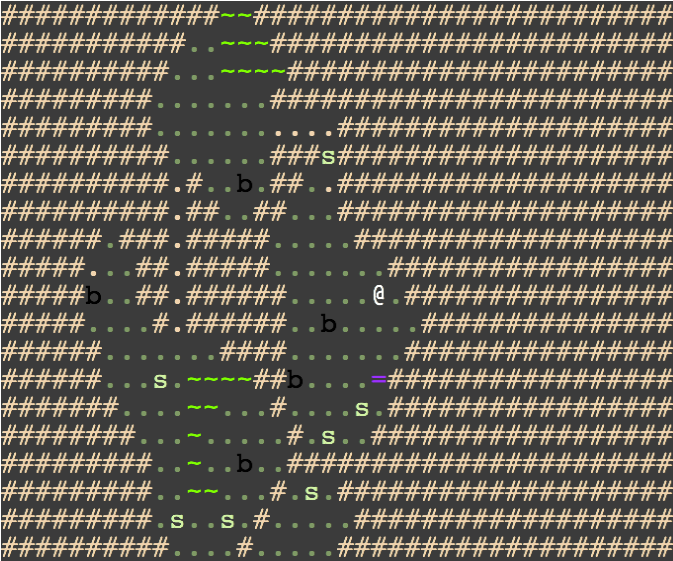
What I briefly want to discuss in this post is technique I employed to generate the levels.
For my roguelike I wanted to generate a series of caves that could house objects and enemies. To achieve this, I used the same method that I experimented with in my previous Lua project. Essentially, you fill the screen with tiles, or in this case ASCII characters, representing solid material (#). This is achieved simply by storing this data in a grid.
for(var y=0; y < rows; y++) {
  map[y] = [];
  display[y] = [];
  for(var x=0; x < columns; x++)
  {
    var tile = new Tile(x, y, '#', default_colour);
    display[y][x] = tile;
    map[y][x] = '#';
  }
}
You then create a series of “drones” to mine out the caves for you. This gives you much more natural looking caves than simply randomly selecting whether a position houses a wall tile or not (0 or 1).
function initialiseDrones() {
  var number_of_drones = Math.floor((Math.random() * max_caves) + min_caves);
  for(var x=0; x < number_of_drones; x++)
  {
    var life = Math.floor((Math.random() * max_size) + min_size);
    var row = Math.floor(Math.random() * (rows-1));
    var column = Math.floor(Math.random() * (columns-1));
    var drone = new Drone(column, row, life);
    mining_drones.push(drone);
  }
}
There is a timer called every 1/4 of a second that iterates over an array storing the drones. It simply calls each drone’s mining function unless the drone is at the end of it’s life, in which case it dies.
for(var x=0; x  0) {
    drone.mine();
  }
  else {
    drone.die(x);
  }
}
These mining drones start in a randomly selected position on the screen, mine that position (replacing the ASCII wall character with a floor character), and then randomly select a direction to move in. Having done this, each drone mines out the next position. And so forth and so on, for the duration of its life.

Drone.prototype.mine = function() {
  updateSymbol(this.row, this.column, this.mine_symbol, this.mine_colour);
  updateSymbol(this.row-1, this.column, this.mine_symbol, this.mine_colour);
  updateSymbol(this.row+1, this.column, this.mine_symbol, this.mine_colour);
  updateSymbol(this.row, this.column-1, this.mine_symbol, this.mine_colour);
  updateSymbol(this.row, this.column+1, this.mine_symbol, this.mine_colour);

  var tile = tileAtPosition(this.row, this.column);
  if(tile!=null) {tile.original_colour = this.mine_colour};
  tile = tileAtPosition(this.row-1, this.column);
  if(tile!=null) {tile.original_colour = this.mine_colour};
  tile = tileAtPosition(this.row+1, this.column);
  if(tile!=null) {tile.original_colour = this.mine_colour};
  tile = tileAtPosition(this.row, this.column-1);
  if(tile!=null) {tile.original_colour = this.mine_colour};
  tile = tileAtPosition(this.row, this.column+1);
  if(tile!=null) {tile.original_colour = this.mine_colour};

  switch(Math.floor((Math.random() * 4) + 1)) {
    //north
    case 1:
      this.row-1 >= 0 ? this.row-=1 : this.row=this.row;
      break;
    //east
    case 2:
      this.column+1 <= columns ? this.column+=1 : this.column=this.column;
      break;
    //south
    case 3:
      this.row+1 = 0 ? this.column-=1 : this.column=this.column;
      break;
  }

  updateSymbol(this.row, this.column, this.symbol, this.colour);
  updateSymbol(this.row-1, this.column, this.symbol, this.colour);
  updateSymbol(this.row+1, this.column, this.symbol, this.colour);
  updateSymbol(this.row, this.column-1, this.symbol, this.colour);
  updateSymbol(this.row, this.column+1, this.symbol, this.colour);

  this.life--;
}
The life of the drone is dictated by a parameter which is actually a randomly selected value between a min and max number. This gives us variance in our cave sizes.
Another point worth noting is that each time the drone mines, it also mines out the 4 wall tiles surrounding it (North, East, South, West). This gives us chunkier caves. You could experiment with different patterns to achieve different effects.
This whole cycle is usually achieved in a loading screen prior to the player seeing it. However, for this jam I wanted to visualise this procedural generation process. This meant creating them as real entities and displaying them on screen which is the reason for having such an elaborate drone object.
Corridor and water generation are done in a very similar way by randomly navigating the caves and updating each grid positions contents.
It’s a simple technique but one that I think is fairly effective.
Anyway, please do check out the game and the source code.